How to Transfer Your Website to a New Domain
 (Credit: Zain Awais)
We assume that you’ve already found a new web host and domain name for your site. Now, you must pack everything for the move. In this case, that means backing up your website. There are three main ways to do this.
The WordPress Method
If you’re working with a WordPress-powered website, you need a WordPress plug-in to wrap up everything. All-in-One WP Migration, Duplicator, and UpdraftPlus are just three of the many options. These easy-to-use plug-ins let you backup your WordPress site with just a few clicks. Using Duplicator, for example, you should:
- Click “Packages” and then “Create New.” This creates a package containing all your site and WordPress elements. It also includes an installer.
- Download the site archive package.
The cPanel Method
You can also use a website’s control panel to backup files. Many popular web hosts use cPanel, for example, to manage files. Here’s how to do it:
- Within cPanel, navigate to the “Files” section and click “Backup Wizard.”
- Make partial backups of your home directory, MySQL databases, and email forwarders. In an odd wrinkle, you don’t want to create a full backup, because you can’t restore from it.
The FTP Method
If you’re familiar with working in a site’s backend, you could backup your site files via File Transfer Protocol (FTP) and phpMyAdmin. This method is also useful if you are moving large files. You can perform an FTP backup with any FTP client—we recommend FileZilla, an excellent piece of free software. Make sure to install the FileZilla Client, and not the FileZilla server.
In addition, you’ll need to have the old site’s sign-in credentials. Here’s how to do it:
- Sign in with the FTP client—or use the File Manager built-in to many control panels—and download the contents of the “Public_HTML” folder.
- Then you’ll want to find phpMyAdmin; it’s usually in your control panel’s “Databases” section. Click the “Export” tab, “Quick” as the Export method, and “SQL” as the format.
- Click “Go.” Doing so creates a database file that automatically downloads to your PC.

2. Check Your DNS Settings
Did you acquire a new domain name from an independent domain registrar? Did the new domain come as part of a web hosting package? Regardless, make sure that your domain name system (DNS) settings are correct before transferring files.
A DNS record ties your domain name to your website and server. These DNS records are usually an IP address, a subset of four numbers (104.17.210.9, for example). There are also general nameservers that come in URL form. You’ll get these from your web hosting provider. If your registrar and web host are the same, you can skip this step. If not, you must add that information to your domain name registrar. Here’s how to do it:
- Log onto your new domain server account and check the server details. This will be in a different spot for each hosting provider. This should include your DNS record and nameservers.
- Log onto your domain registrar and edit the DNS record and nameservers to match your new domain.
- Wait, as it can take 24-48 hours for the process to work.
3. Transfer Files to a New Domain
This step is essentially the reverse of the first step. You’ll need an archive of all the files from your original site’s directory, as well as the database, which tells your web server where all the content goes. It’s important to make sure both are in the right place.
First, make sure the new website already has a database. (For WordPress sites, this will usually be wp-config.php.) Then, using phpMyAdmin, import the archive file’s content into the existing database. Select the “Import” options in phpMyAdmin, choose the file on your PC, and click “Go.” This should import all the database entries from your old site into the new one. Now, you can transfer your site files.
How to Transfer Files Using WordPress
- You’ll need to use the installer and archive package you downloaded in the first step. If you installed the All-in-One WP Migration plugin, for example, do so in your new server.
- Use an FTP client or the built-in File Manager to connect to your new web host
- Click the installer to begin the restoration process.
UpdraftPlus and similar plug-ins may have a clone or migrate option that lets you restore everything from a file on your PC.
How to Transfer Files Using cPanel
- If you went the cPanel route, simply go to the Backup Wizard on your new domain and restore your site from the previously created files. This is the “no muss, no fuss” option.
How to Transfer Files Using FTP
- Use an FTP client or the site’s built-in File Manager to connect to your new web host.
- Upload the files from your old site’s home directory archive to the new host’s home directory.
- Upload your database files.
4. Make Sure to Redirect Pages
If you want traffic heading to your old domain to make its way to your new one, you need to redirect the old site to the new site. Otherwise, people will see a 404 Page Not Found error when they try to reach your site at the old domain. You can set up a 301 redirect in .htaccess to get traffic to the correct URL. Follow these steps to set up your redirects:
- Use FTP or the File Manager to connect to your old domain’s registrar or hosting account.
- Edit the .htaccess file. This will be in your home directory or in the same directory as your wp-admin folder for WordPress users.
- Open the .htaccess file and add the following code:
#Options +FollowSymLinksRewriteEngine onRewriteRule ^(.*)$ http://www.mydomain.com/$1 [R=301,L]
- Replace “mydomain.com” with your new domain name.
Now, your old domain name should redirect to your new one. If it doesn’t, you should contact your old hosting service’s tech support team for assistance.
5. Fix Broken Links
If you did everything right, the new site’s links should work. However, some links may break and Google may penalize you for it (you don’t want that!). So use Dead Link Checker, Dr. Link Check, or w3C Link Checker to discover those broken links. You must fix each dead link one by one, editing their locations by hand. It’s worth the effort, though.
6. Let Google Know About the Site Transfer
Now let Google know about your new home! This is especially important if you’ve performed 301 redirects to your new site. You can do this using some of Google’s own tools.
- If you’re using the Google Search Console with your old domain, click the gear icon, and select “Change of Address.”
- Input your new domain name here, and let Google handle the search traffic redirect.
You’ll also want to have an XML sitemap for your new domain. If you’re using WordPress, here’s how to make that happen.
- Install the Yoast SEO plugin. The plugin will automatically create an XML sitemap at: http://newsite.com/sitemap_index.xml. That’s it!
If you’re not using a WordPress-powered site, there are other options.
- Visit XML-Sitemaps.com to generate one for your new website.
- Download the file created, and then use an FTP client or File Manager to upload the file to your site’s home directory. The file should be “sitemap.xml,” meaning its URL will be: http://newsite.com/sitemap.xml
- Then, under Google Search Consoles, click on “Sitemaps” under the “Index” section. Then you can add whichever URL above and click “Submit.”
Now, Google can crawl your website with ease.
7. Check Your Site
The last step is the easy one: Check your new domain! Take time to click around your site to ensure all the posts, images, and videos are in their correct locations. Fix any missing items on your backend.
Tell your community about the domain change if you have a fairly popular site. You may have service interruptions as the migration process moves forward, so it’s good to let your visitors know why. Regardless, welcome to your new home on the web.
For more on web hosting, check out The Best Courses for Learning How to Build Websites. Once your site is live, use these 10 Easy But Powerful SEO Tips to boost traffic.
Mike Williams contributed to this story.
How to manually migrate a WordPress Site (2024 Guide)
Do you want to learn how to manually migrate a WordPress site?
Migrating your WordPress website manually from one host to another can feel overwhelming, especially if you’re doing it for the first time. But with the right steps and some technical know-how, you can successfully move your WordPress site yourself.
This article will provide you with step-by-step instructions on how you can migrate your website manually.
Table of contents
- 1. Export your WordPress database
- 2. Download your site files
- 3. Upload your site files to the new server
- 4. Create a new database
- 5. Edit the wp-config.php file
- 6. Import your original database
- 7. Change DNS settings
- 8. Update URLs (optional)
- Bonus: The easiest way to migrate a WordPress site
Expert tip: Before you start, make sure to create a backup of your WordPress website. This way, you’ll have a copy of all your files and databases if anything goes wrong during the migration process.
1. Export your WordPress database
Let’s begin by exporting your WordPress database.
A WordPress database is where all your website data is stored. Most hosting providers allow you to access and export it through a database manager known as phpMyAdmin.
Here’s how you can export your WordPress database in phpMyAdmin:
- Log in to phpMyAdmin and choose the database you want to download. Your WordPress database will typically have a name that starts with “wp_“.
- Navigate to the Export tab located in the top menu.
- Select “Quick – display only the minimal options” as your Export method and ensure the Format is set to SQL.
- Simply click the Go or Export button at the bottom of the page to export the database.
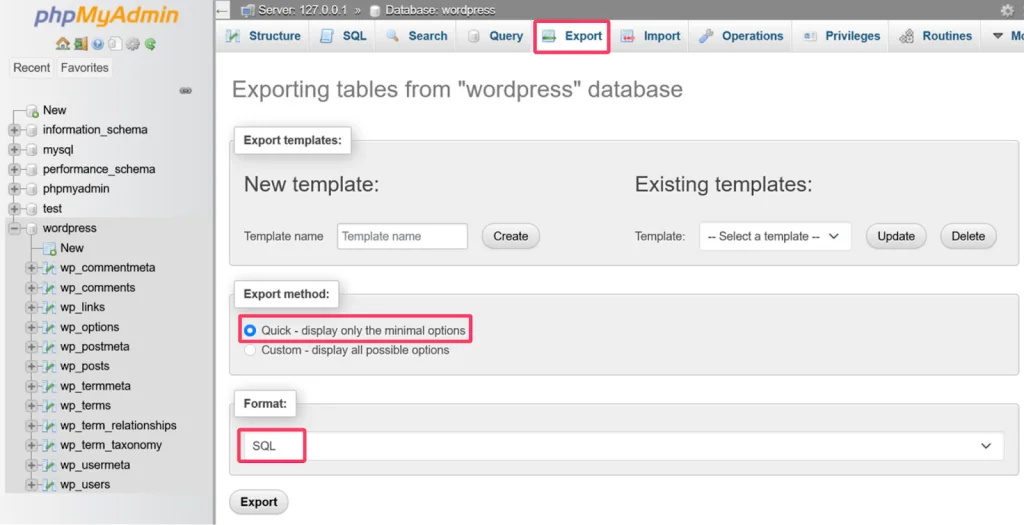
Once the download is complete, the database will be saved as a .sql file. Compress this file in zip format and save it on your computer.
Remember: This downloaded .sql file is the heart of your website’s migration. Your website’s functionality depends on it, so handle it with care.
2. Download your site files
The next step is to download your WordPress files. The typical way to do this is to log into your server via an FTP client (such as FileZilla) and transfer the files to your local computer.
Here’s how you can do it:
Begin by installing an FTP client on your computer. For our demonstration, we’ll be using FileZilla as our FTP client. Once installed, open the FTP client.
In FileZilla, enter the hostname, FTP username, password, and port number in the fields at the top of the interface. You’ll need to gather this information from your hosting provider.
Then, click on the Quickconnect button to establish a connection with your server.

Once connected, you’ll see your site files in the right panel. Navigate to the public_html folder, which is your WordPress installation directory, and select all the files and folders within it. Right-click on the selected files and choose the “Download” option.
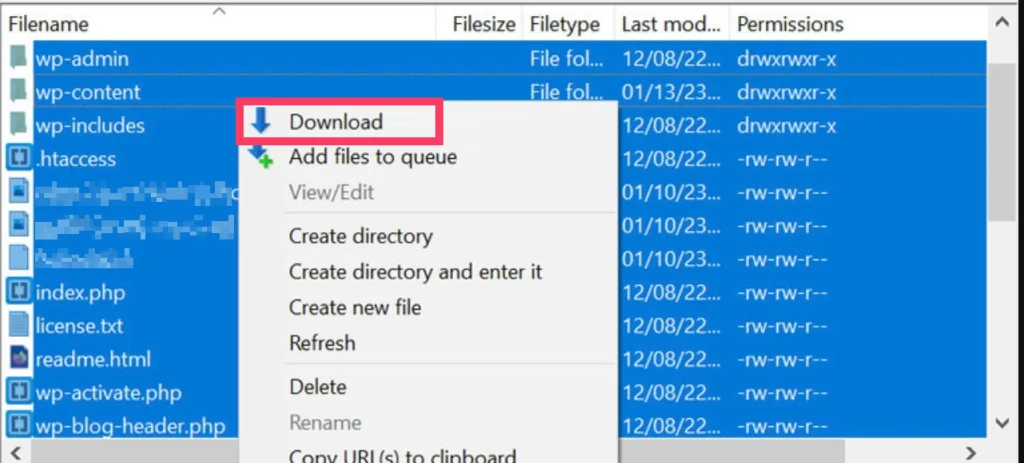
FileZilla will then transfer the files from the server to your local computer. Compress all the downloaded files into a single zip archive. This not only saves space but also simplifies the upload process on the new server.
3. Upload your site files to the new server
Now that your WordPress files are downloaded and compressed into a zip archive, it’s time to upload them to your new server.
For this, you can use FTP or head over to the new website’s file manager provided by your hosting provider. Similar to your old website, locate and open the public_html folder.
If the new server already has a website running on it, it’s recommended to delete its contents before uploading your files. This ensures a clean migration and avoids potential conflicts with existing data.
Caution: Only proceed with deleting existing content if you’re absolutely certain you want to replace it. This step is irreversible.
Upload the downloaded compressed zip file containing your WordPress files to this directory.
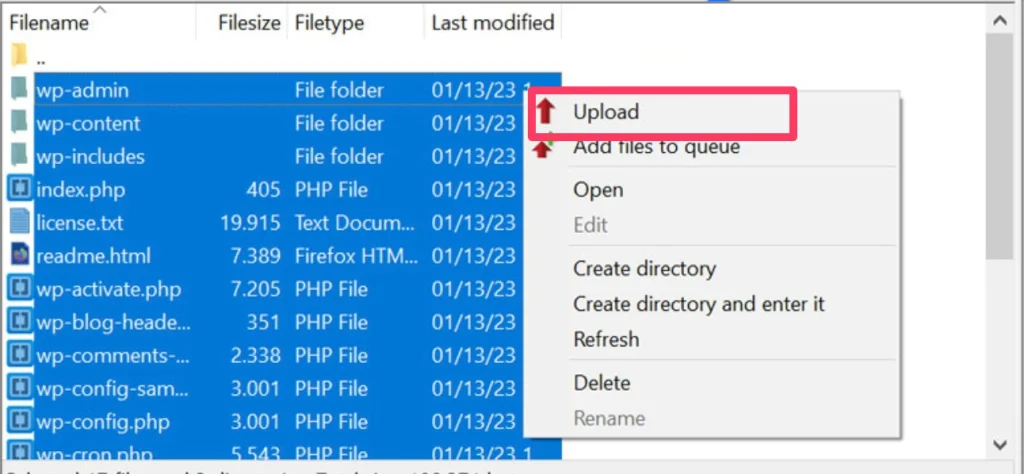
Once the upload is complete, extract the zip file within the public_html directory. This will unpack all your essential WordPress files and folders into their designated locations within the public_html directory. Without extraction, your website won’t function properly.
4. Create a new database
For a new WordPress setup, you’ll need to create a fresh database to import your saved SQL data. The process varies depending on your hosting provider, but there are two primary methods to create a database.
Method 1: Using cPanel
- Login to cPanel with the cPanel username and password.
- Click on the “MySQL Databases” icon.
- In the “Create New Database” section, enter a database name and click Create Database.
Method 2: Using phpMyAdmin
- Access phpMyAdmin using the provided login credentials.
- Select the Database tab. This will redirect you to a list of existing databases and an option to create a new one.
- Enter the new database name into the “Create a new database” field.
- Click Create.
5. Edit the wp-config.php file
Configuring the wp-config.php file is one of the most important steps in WordPress website migration. This file contains essential information about your new database that lets WordPress connect to its data.
Here’s how to edit the wp-config.php file depending on your situation:
- Fresh WordPress install: Open the directory and find the file named “wp-config-sample.php”. Make a copy of this file in the same location and rename it to wp-config.php.
- Existing site migration: If you have a website running, you should already have a wp-config.php file ready for editing.
Regardless of the scenario, open the file in a code editor (Notepad++ or similar) and look for this specific section:
/** The name of the database for WordPress */
define( ‘DB_NAME’, ‘database_name_here’ );
/** Database username */
define( ‘DB_USER’, ‘username_here’ );
/** Database password */
define( ‘DB_PASSWORD’, ‘password_here’ );
/** Database hostname */
define( ‘DB_HOST’, ‘localhost’ );
In this section, you’ll find details like database name, username, and password. Replace this information with that of your new host.
If you’re using a new wp-config.php file, you should also replace your unique keys as well.
Once done, save the file.
6. Import your original database
You also need to import your old database into the new one you created. For this:
- Log in to phpMyAdmin for your new site again and navigate to the database you created.
- Go to the Import tab.
- Click the Browse button under the “File to import” section to select and upload your database file.
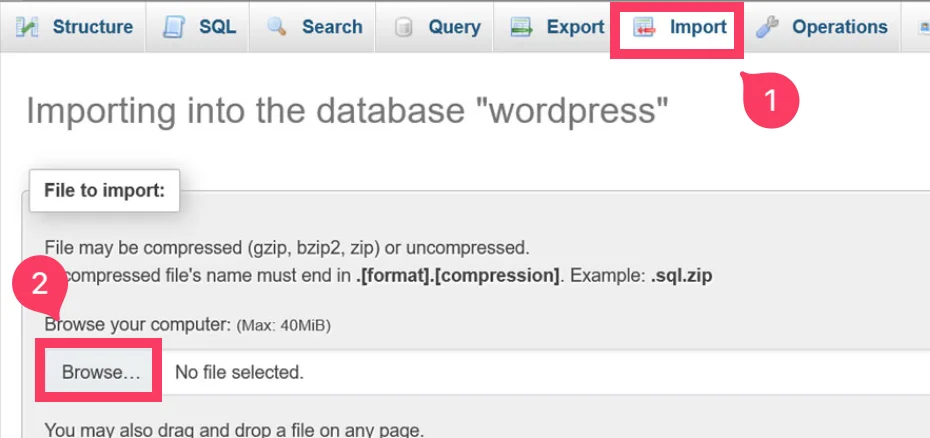
4. Once you’ve chosen the file, click the Import button at the bottom of the screen.
This will begin the process of importing your original database.
7. Change DNS settings
Your website should be up and running on your new server or domain name. But there’s one more thing to handle: the Domain Name System (DNS).
DNS translates your domain name (like google.com) into an IP address (such as 192.0.2.1) that computers can understand. Right now, your DNS is probably still pointing to your old host. To make sure visitors find your new location, you’ll need to update your DNS to point to your new host
However, the exact steps will vary depending on where you registered your domain name. Most registrars offer clear instructions on their websites. Just search for it on your domain registrar’s website and follow their guide.
8. Update URLs (optional)
This step is only necessary if you migrate your WordPress site to a new domain. If you’re keeping the same domain, you can skip this section.
To update your URL references, you can use the Search Replace DB script. Upload the script to your server using FTP and run it in a web browser to make the necessary updates. After using the script, immediately delete it from your server. Leaving it accessible could compromise your site’s security.
Alternatively, you can also use a plugin like Better Search Replace to make these changes. It’s a safer and more user-friendly approach than using the scripts.
Bonus: The easiest way to migrate a WordPress site
Let’s face it. Manually migrating a WordPress website is not a wise decision, especially if you’re a non-technical person. It’s a complex process that involves steps like exporting databases, editing files, and potentially code tweaks – all while hoping nothing breaks.
So, the easiest and safest alternative for migrating a WordPress site is to use a free WordPress migration plugin like UpdraftPlus.
UpdraftPlus lets you migrate your website to a new location by restoring a backup on another WordPress installation.
All you need to do is create a backup of your live site and download it. Within UpdraftPlus on the new site, navigate to Existing backups > Upload backup files and upload the backup file you downloaded from your old site. Once the upload is complete, select the backup and choose the Restore option.
It’s as simple as that!
If you upgrade to the premium version, you can fully customise every aspect of the migration. It means that you can even select specific plugins and themes to transfer.
All this takes away the stress of going through complicated steps and worrying about losing important data.
Conclusion
And that’s it!
Moving your WordPress site from one host to another might seem scary, but it doesn’t have to be. By following the steps outlined in this article, it’s totally possible. Several migration plugins are available that can make your site migration process even easier. Just make sure you’re prepared and have enough time, and you can do it.
FAQs
How do I manually move a WordPress site?
To manually move a WordPress site:
- Export the database of your current WordPress site using phpMyAdmin
- Move your site files to the new hosting server via FTP or a file manager
- Create a new database on the new server
- Update the database credentials and site URL in the wp-config.php file of the new hosting
- Import the previously exported database
How do I migrate my WordPress site for free?
To migrate your WordPress site for free, you can either do it manually or by using a plugin. For manual migration, export your site’s database via phpMyAdmin, transfer site files, create a new database, update wp-config.php, and import the database. Alternatively, you can opt for a plugin such as UpdraftPlus, which simplifies the migration process by handling complex tasks.
How to easily move my WordPress site?
The easiest way to migrate your WordPress site is to use a plugin like UpdraftPlus. UpdraftPlus creates a complete backup of your site (files, themes, plugins, database) and lets you restore it on a new WordPress installation. It’s a simple four-step process: backup, download, upload to the new site, and restore.